Locations Editor
Keep the places you generate ephemerides for available in every study's Location drop-down. The Locations Editor holds your saved locations, and every study and the Default Settings Editor offer them.
Open the editor with Edit → Locations or the Locations toolbar button. Click Add to add a location, click a row and then a cell to edit it, select rows and click Delete to remove them, then click Save and Close.
Every study needs a location, whatever its coordinate origin: Cygnus gives the date and time of every ephemeris in the time zone of the study's location. The editor works out each location's time zone from its latitude and longitude, so you enter only the name, the coordinates and the height.
The Locations Editor is a modal window: close it to return to the main window.
Open the Locations Editor
To open the Locations Editor:
- Open the Edit menu (see Open the Edit Menu).
- Click Locations in the Edit menu.
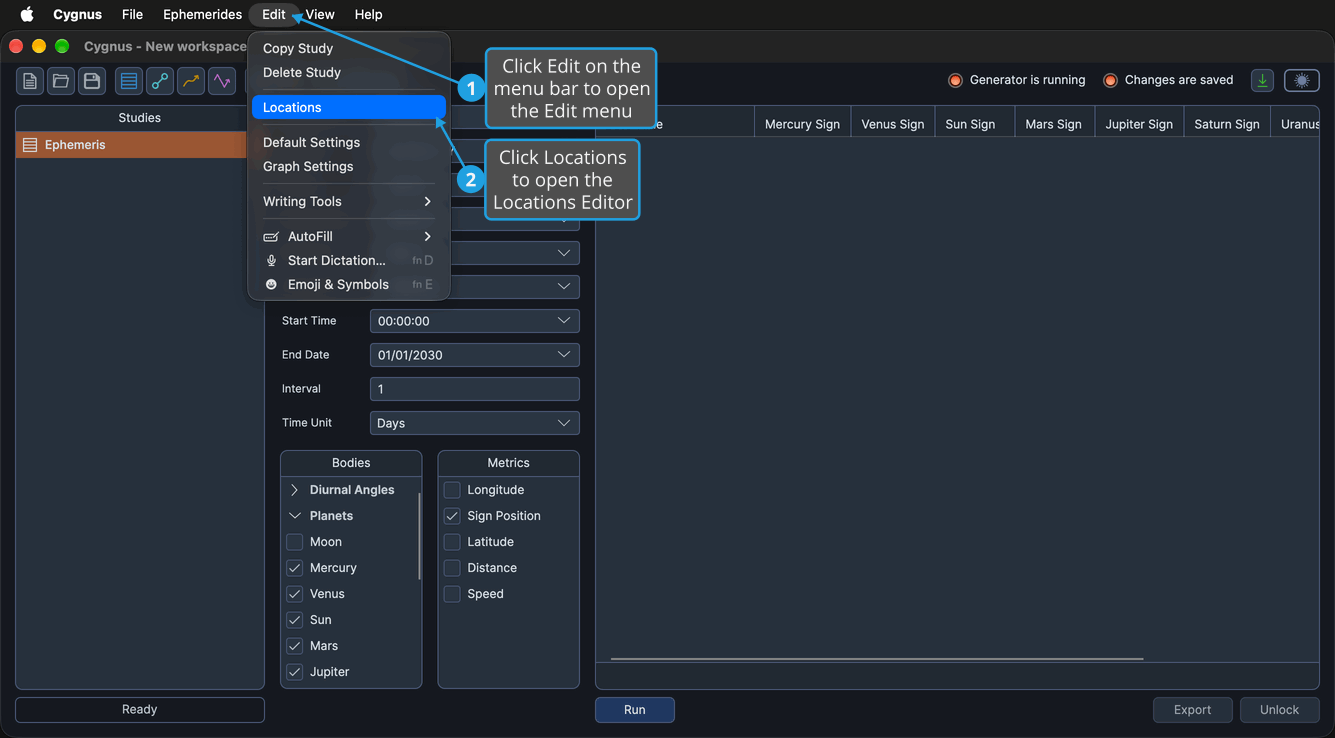
The Locations Editor opens over the main window. Its table lists each saved location's Name, Latitude, Longitude and Height (feet).
On macOS, the Edit menu is in the menu bar at the top of the screen. You can also click the Locations button on the Toolbar.
Add a Location
Add a new row to the table, ready for you to fill in:
- Click Add below the table.
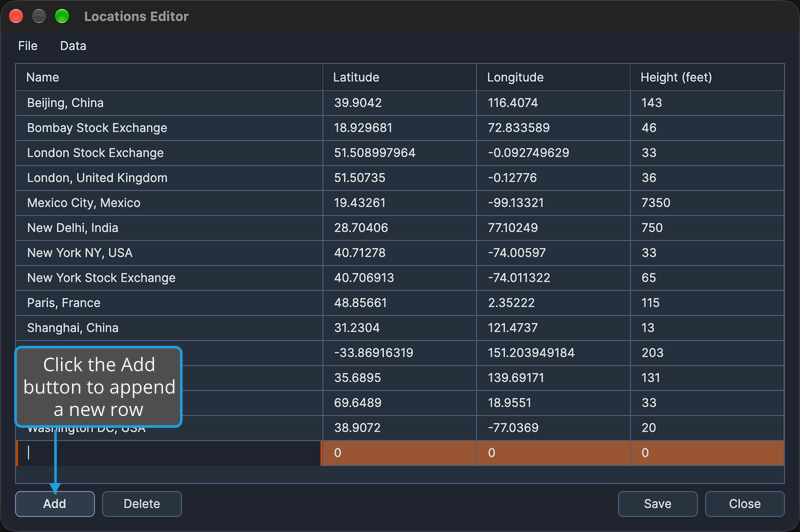
The new row is appended to the table, selected and opened for editing at its Name cell. Its Name cell is empty, and its Latitude, Longitude and Height (feet) cells show 0. Type the name and press Tab to move to the Latitude cell, then fill in the other cells the same way (see Edit a Location). A row left without a name is skipped when you save the list.
A named row is saved with the values in its cells. If you name a row but leave its Latitude and Longitude cells at 0, it is saved at latitude 0, longitude 0, so enter its coordinates before you save.
You can also add a row from the keyboard: while you edit the Height (feet) cell of the last row, press Tab. The new row opens for editing at its Name cell.
Edit a Location
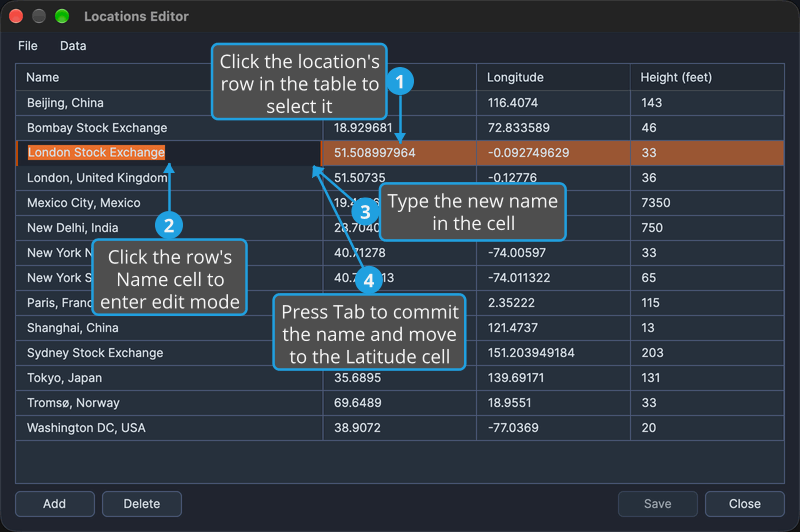
Edit any cell of the table in place. Click the location's row to select it, then click the cell you want to change: a single click on a cell of the selected row enters edit mode. Type the new value and commit it with one of these keys:
- Tab commits the value and moves to the next cell. From the Height (feet) cell it moves to the Name cell of the next row, and from the last row it adds a new location row.
- Shift+Tab commits the value and moves back a cell.
- Enter commits the value in place, and the cell leaves edit mode.
The row stays in edit mode until the focus leaves it, for example when you click another row or another control, so you can tab to or click each cell of the row in turn. Every edit is an unsaved change until you save the list.
Edit a Location's Name
The name identifies the location in every Location drop-down. To rename a location:
- Click the location's row in the table to select it.
- Click the row's Name cell to enter edit mode.
- Type the new name.
- Press Tab to commit the name and move to the Latitude cell.
Edit a Location's Latitude
Latitude is in decimal degrees, from -90.0 (south) to +90.0 (north). To change a location's latitude:
- Click the location's row in the table to select it.
- Click the row's Latitude cell to enter edit mode.
- Type the new latitude as a decimal number of degrees.
- Press Tab to commit the latitude and move to the Longitude cell.
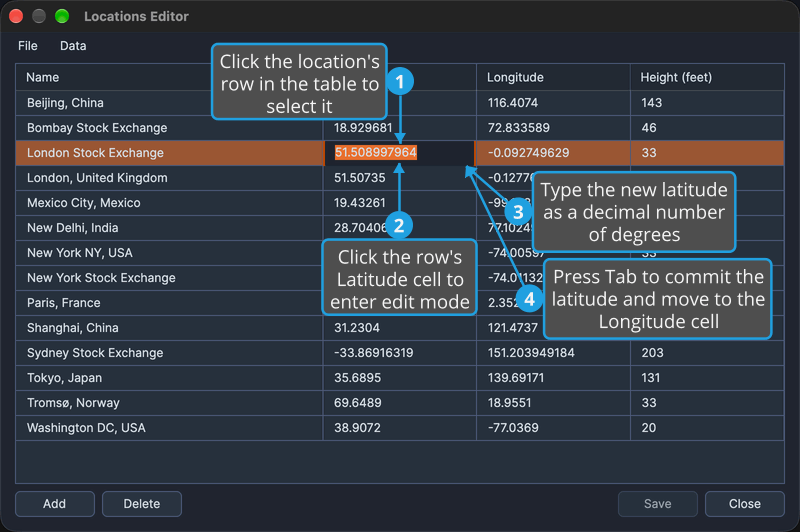
Cygnus works out the location's time zone again from its new latitude and longitude.
Edit a Location's Longitude
Longitude is in decimal degrees, from -180.0 (west) to +180.0 (east). To change a location's longitude:
- Click the location's row in the table to select it.
- Click the row's Longitude cell to enter edit mode.
- Type the new longitude as a decimal number of degrees.
- Press Tab to commit the longitude and move to the Height (feet) cell.
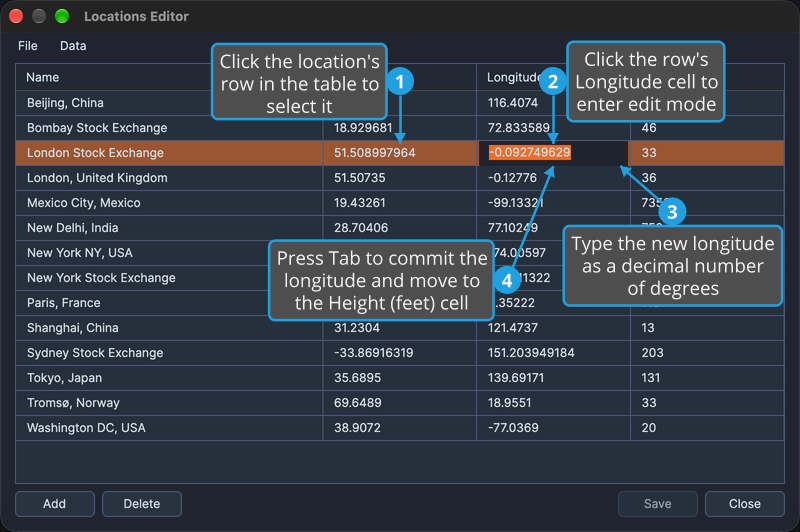
Cygnus works out the location's time zone again from its latitude and new longitude.
Edit a Location's Height
Height is the location's elevation above sea level, in feet. It does not affect the location's time zone. To change a location's height:
- Click the location's row in the table to select it.
- Click the row's Height (feet) cell to enter edit mode.
- Type the new height in feet.
- Press Tab to commit the height and move to the next row.
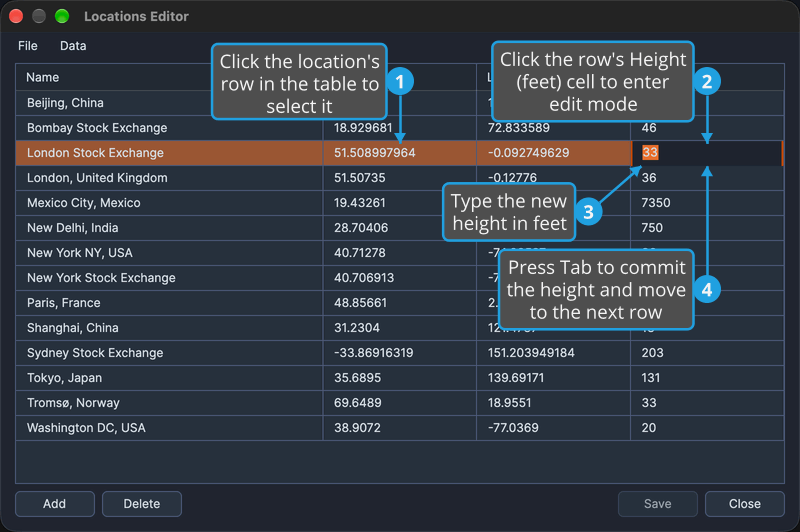
Tab moves to the Name cell of the next row. From the last row, it adds a new location row and opens its Name cell for editing.
Commit a Cell Edit in Place
To commit the value you typed in a cell without moving to another cell:
- Press Enter.
The value is committed and the cell leaves edit mode. To commit the value and move to the next cell instead, press Tab.
Delete Locations
Remove locations you no longer need from the table. To delete a location:
- Click the row of the location you want to delete.
- Click Delete below the table.
- Confirm the deletion when Cygnus asks "Delete the selected locations?" (see Confirm a Confirmation Request).
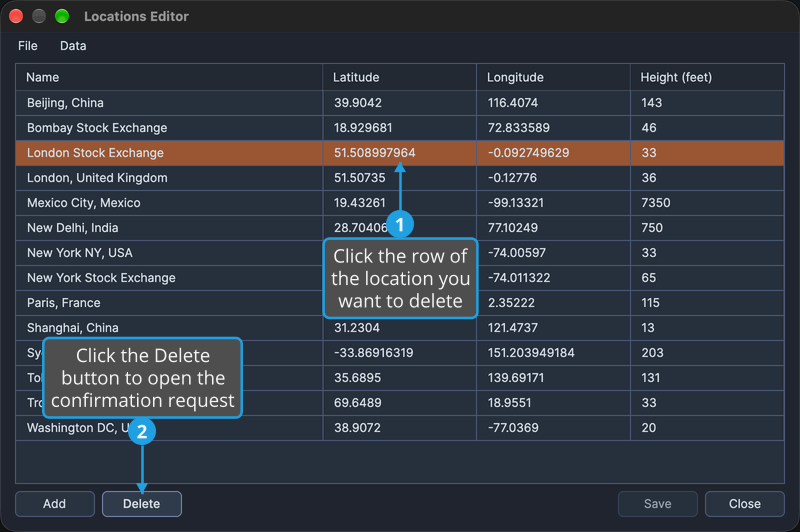
To delete several locations at once, Cmd-click (Ctrl-click on Windows) or Shift-click to select their rows before you click Delete.
The locations are removed from the table and a neighboring row is selected. The deletion is an unsaved change: it is kept only when you save the list. To keep the locations, decline the request instead (see Decline a Confirmation Request).
You can also press Delete or Backspace to delete the selected rows while the table has the focus and no cell is being edited.
Save the Locations
Save the edited list so that every study and the Default Settings Editor offer it:
- Click File on the Locations Editor's menu bar.
- Click Save in the File menu.
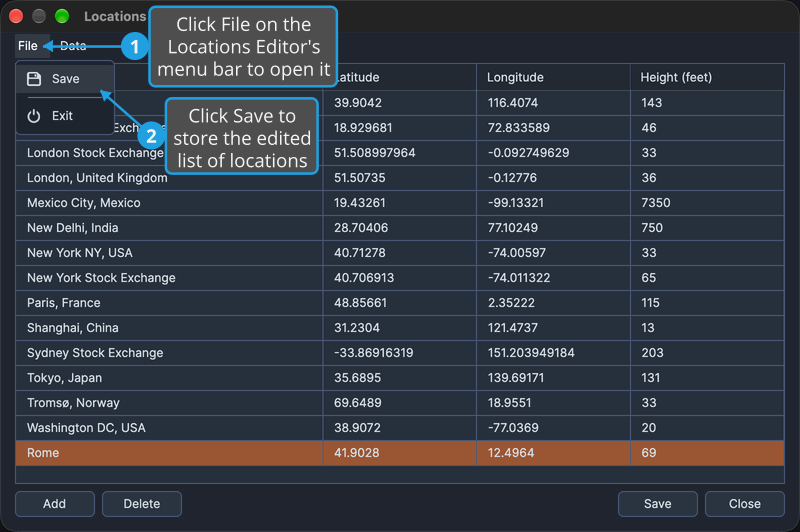
Cygnus saves the locations in sorted order and skips any row without a name. Save stays unavailable until you make another change.
You can also click the Save button at the bottom right of the editor, or press Cmd+S (Ctrl+S on Windows). Both work only while the editor has unsaved changes.
Close the Locations Editor
When the editor has no unsaved changes, close it to return to the main window:
- Click File on the Locations Editor's menu bar.
- Click Exit in the File menu.
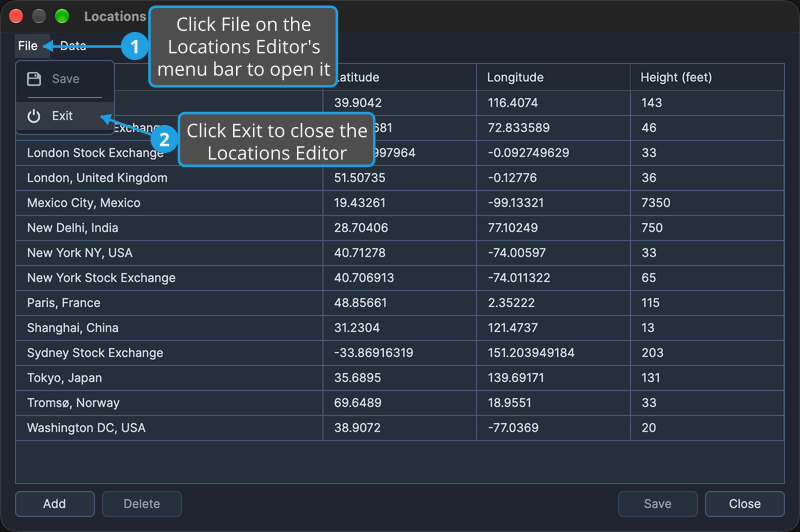
The Locations Editor closes. You can also click the Close button or the window's title-bar close button.
Close the Locations Editor and Save Changes
When the editor has unsaved changes, every way of closing it first asks, "Would you like to save your changes before closing?" To save the changes and close the editor:
- Click File on the Locations Editor's menu bar.
- Click Exit in the File menu.
- Save the changes in the Unsaved Changes prompt (see Save Changes from the Unsaved Changes Prompt).
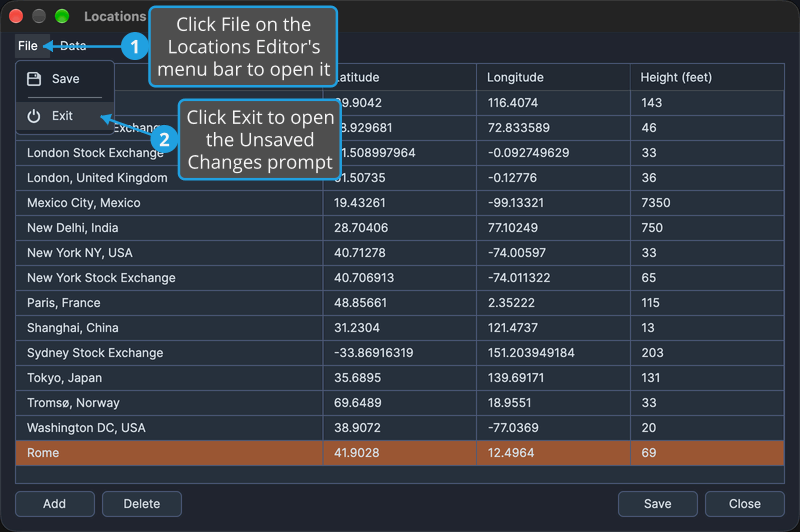
Cygnus saves the edited locations in sorted order, skips any row without a name, and closes the Locations Editor. If the save fails, the editor stays open with your changes.
To close the editor without saving, answer No instead (see Discard Changes from the Unsaved Changes Prompt). To keep the editor open, answer Cancel (see Cancel from the Unsaved Changes Prompt).
Menu Bar
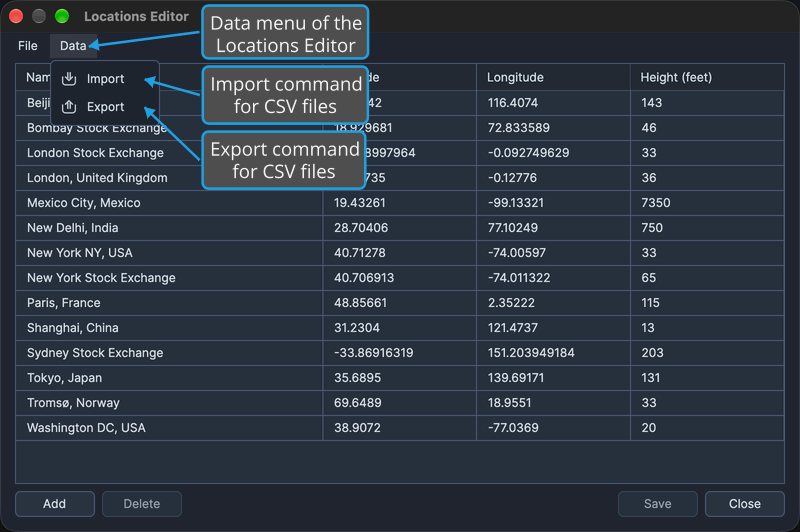
The Locations Editor has its own menu bar, shown on every platform, with a File menu and a Data menu. On Windows, Alt+F opens the File menu and Alt+D opens the Data menu.
File Menu
| Command | Description | Details |
|---|---|---|
| Save | Saves the list of locations. | Same as the Save button. |
| Exit | Closes the Locations Editor, offering to save unsaved changes. | Same as the Close button. |
Data Menu
| Command | Description | Details |
|---|---|---|
| Import | Adds the locations of a CSV file to the table. | See Import Locations. |
| Export | Writes the table's named locations to a CSV file. | See Export Locations. |
Locations Table
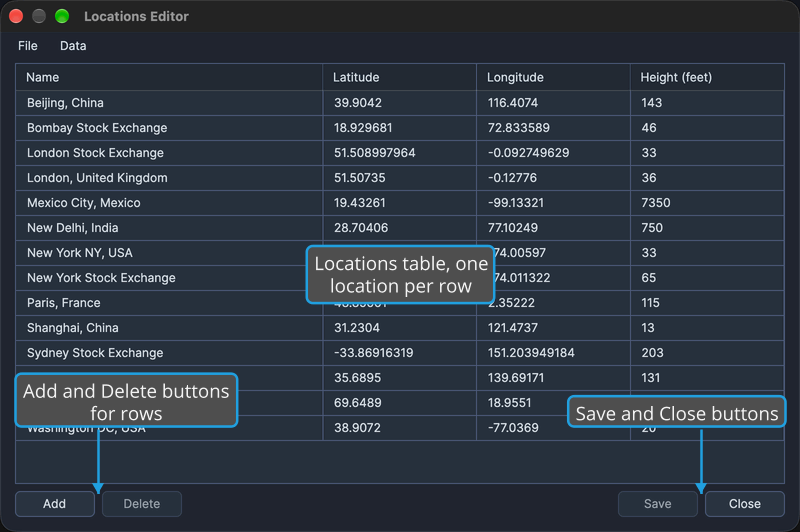
The table lists one saved location per row, in four columns:
| Column | Description |
|---|---|
| Name | The location's name, which identifies it in every Location drop-down. A row without a name is skipped when you save the list and when you export it. |
| Latitude | Latitude in decimal degrees, from -90.0 (south) to +90.0 (north). |
| Longitude | Longitude in decimal degrees, from -180.0 (west) to +180.0 (east). |
| Height (feet) | Elevation above sea level, in feet. |
The columns are fixed: you cannot sort the rows by clicking a column heading, and you cannot reorder or resize the columns. A location's time zone has no column of its own; Cygnus works it out from the Latitude and Longitude values.
Related Topics
- Import Locations: add locations from a CSV file instead of typing each one.
- Export Locations: keep a copy of your locations in a CSV file.
- Default Settings Editor: choose the location new workspaces and new studies start with.
- Location and Reference System: choose the location of a study.
- Toolbar: open the Locations Editor with one click.