Import Natal Records
The Import command in the Natal Records Editor reads natal records from an external file and merges them into the natal records database. Use Import to bring in records from a colleague, from another Aquila installation, or from a backup.
File Format
Aquila imports natal records from a UTF-8 encoded CSV file with six comma-separated columns in this order:
| Column | Description |
|---|---|
| Name | The name of the natal record. Quote the value with " if it contains a comma. |
| Natal Date | Date and time in yyyy-MM-dd HH:mm:ss format (for example 1776-07-04 17:10:00). Other common date formats are also accepted as a fallback. |
| Location Name | The display name for the birth location. Quote the value with " if it contains a comma. |
| Latitude | Decimal degrees, positive for north and negative for south (e.g. 40.71278). |
| Longitude | Decimal degrees, positive for east and negative for west (e.g. -74.00597). |
| Height | Elevation above sea level in feet (e.g. 33). |
A header row is optional and is auto-detected. The time zone is not provided in the CSV; Aquila resolves it automatically from the latitude and longitude. Embed a literal " inside a quoted field by doubling it as "".
Example:
Name,Natal Date,Location Name,Latitude,Longitude,Height
U.S. Independence Day,1776-07-04 17:10:00,"Philadelphia, PA",39.95258,-75.16522,39
NYSE Buttonwood Agreement,1792-05-17 09:00:00,"New York, NY",40.70637,-74.00913,33
Import Records From a File
To import natal records from an external file:
- Click Data on the dialog menu bar.
- Click Import in the Data menu.
- Select the file to import in the Open File dialog and click Open.
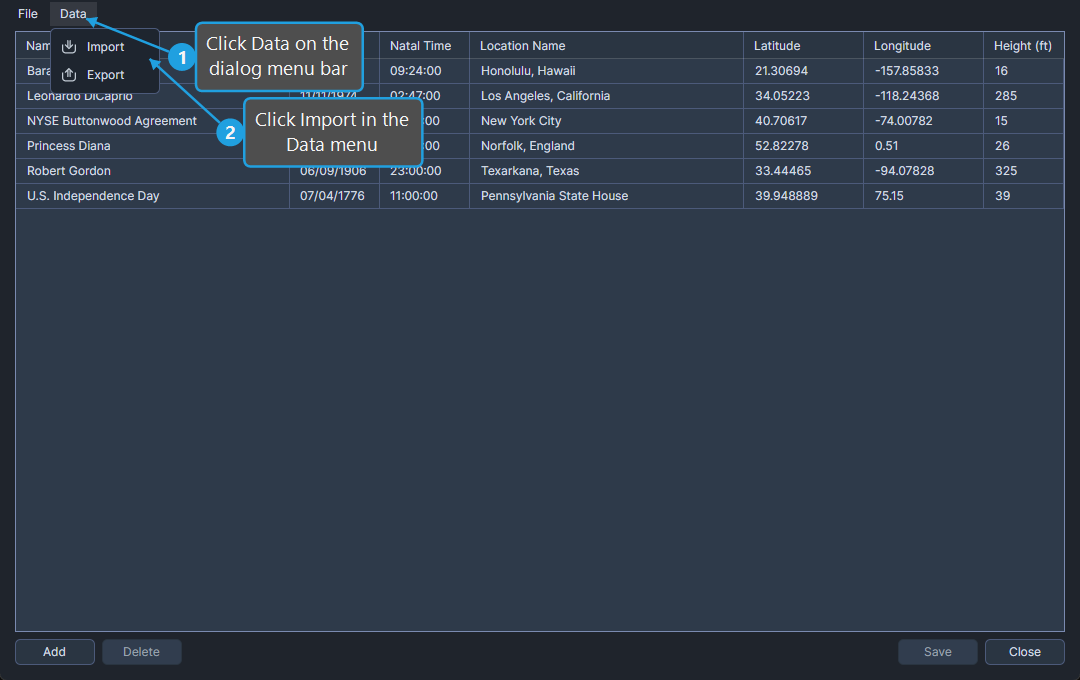
The imported records are merged into the natal records table. Save the merged database to disk by clicking the Save button.