Bodies List Presets
Reuse the body selections you work with often instead of selecting bodies one by one. A bodies list preset is a named body selection that you save from a list and apply to it again later. Right-click any body row in the list, point to Presets and click a preset's name to apply it, or right-click a preset's name for its options. Choose New Preset to save the current selection, or Clear Default to stop applying a default.
The body lists have no presets button. You reach the presets from the context menu of a body row; right-clicking a group header row opens no menu.
Presets are kept separately for three kinds of list: Bodies lists, Inner Bodies lists and Outer Bodies lists. Each list offers only presets of its own kind, and the default preset of each kind is applied to that list in every new study. Presets are shared across studies and kept between sessions.
Unless you change the defaults, a new Ephemeris or Graphic Ephemeris study starts from the Mercury -> Pluto preset, and a new Aspect Ephemeris or Graphic Aspect Ephemeris study starts with both of its lists empty, because no Inner Bodies or Outer Bodies preset is marked as the default.
Select the study in the Studies list before you follow the procedures on this page. On an Aspect Ephemeris or Graphic Aspect Ephemeris study, the Inner Bodies and Outer Bodies lists are on the Inner & Outer Bodies tab. Click that tab before you follow the procedures on this page.
The body row menu is unavailable while the study holds generated results. To use presets after the study is generated, unlock the study first, as described in Unlock Study.
Apply a Bodies List Preset
Replace the list's body selection with a saved preset.
- Right-click any body row in the list.
- Click Presets in the context menu.
- Click the preset's name in the Presets submenu.
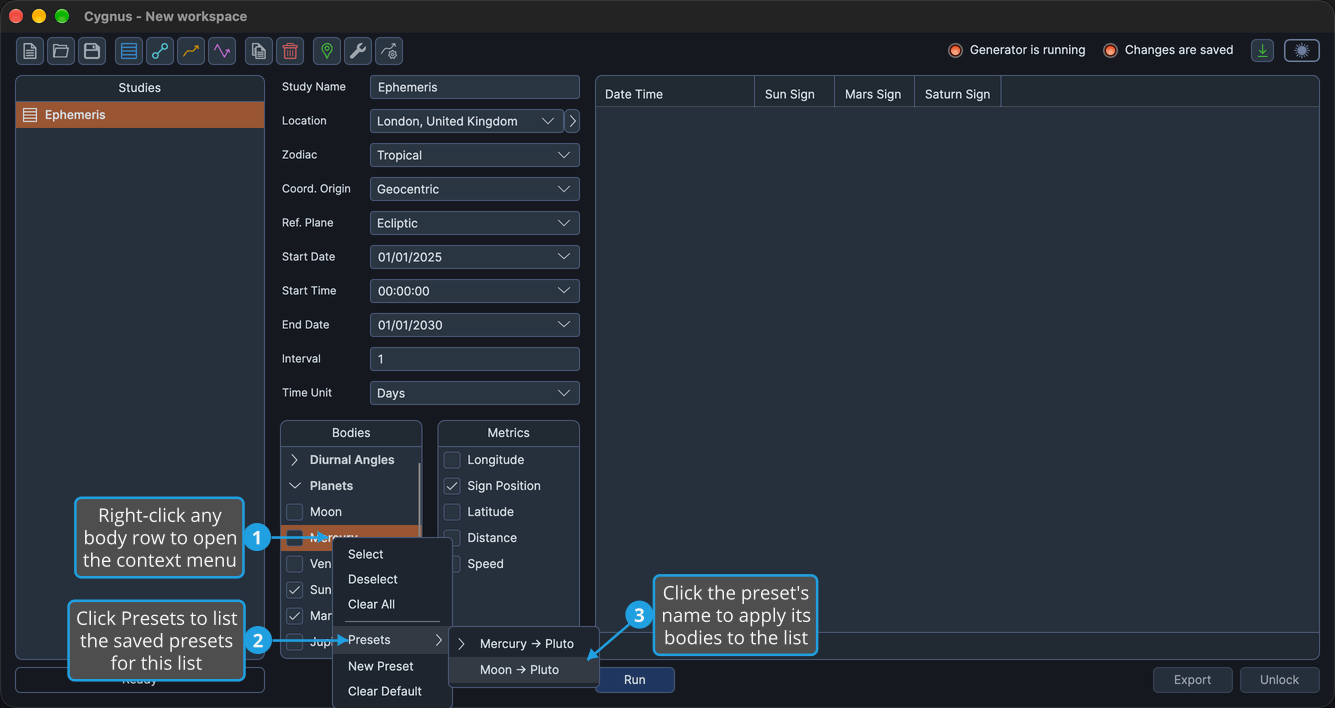
The preset's bodies replace the list's selection. Bodies that the study's coordinate origin does not offer are skipped, and the Sun and Earth stand in for each other between Heliocentric and the other origins.
Save the Selection as a New Preset
Save the list's current body selection as a named preset.
- Right-click any body row in the list.
- Click New Preset in the context menu.
- Enter a name for the preset in the name box of the Enter Name dialog.
- Click Save.
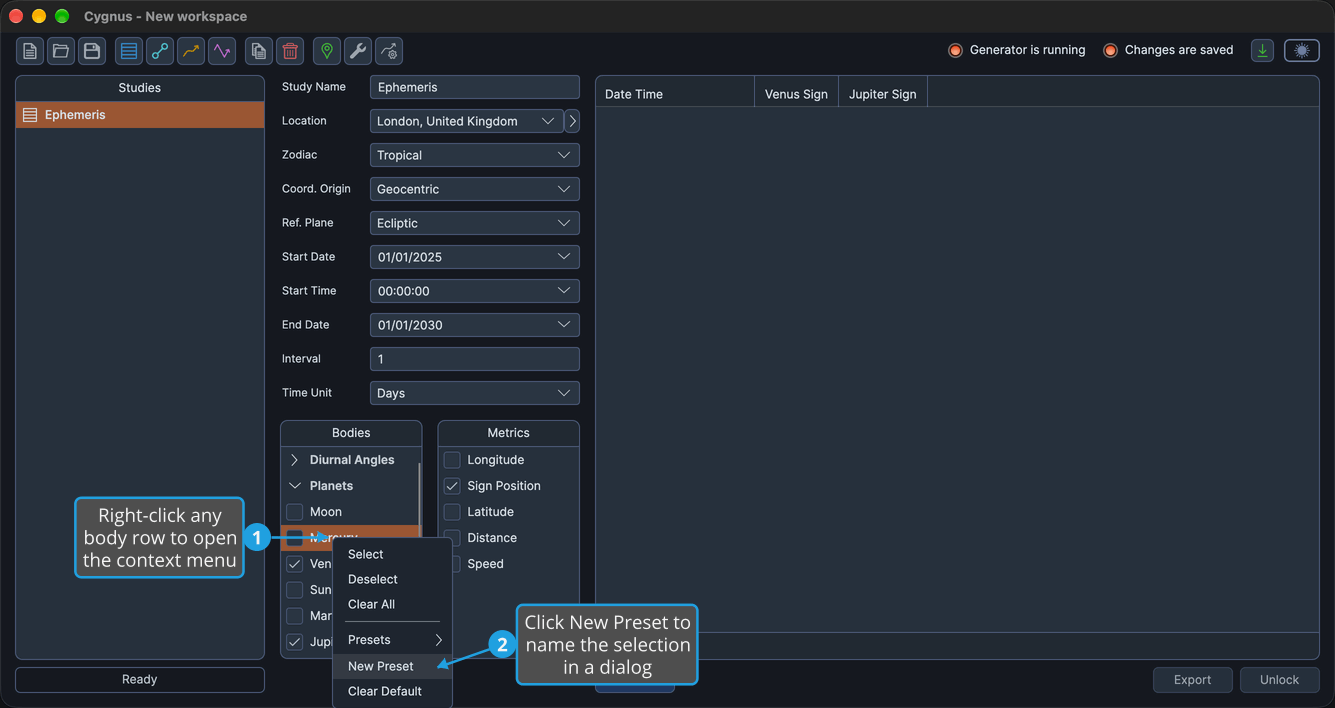

The preset appears in the Presets submenu of every list of the same kind, in every study. New Preset sits in the context menu itself, below the Presets submenu.
In the Enter Name dialog, Save is available only while the name box holds text, and pressing Enter also saves. Click Cancel or press Esc to close the dialog without saving. The dialog is described in Ephemeris Presets.
Set the Default Preset
Make a preset the one applied to this kind of list in every new study.
- Right-click any body row in the list.
- Click Presets in the context menu.
- Right-click the preset's name and choose Set Default.
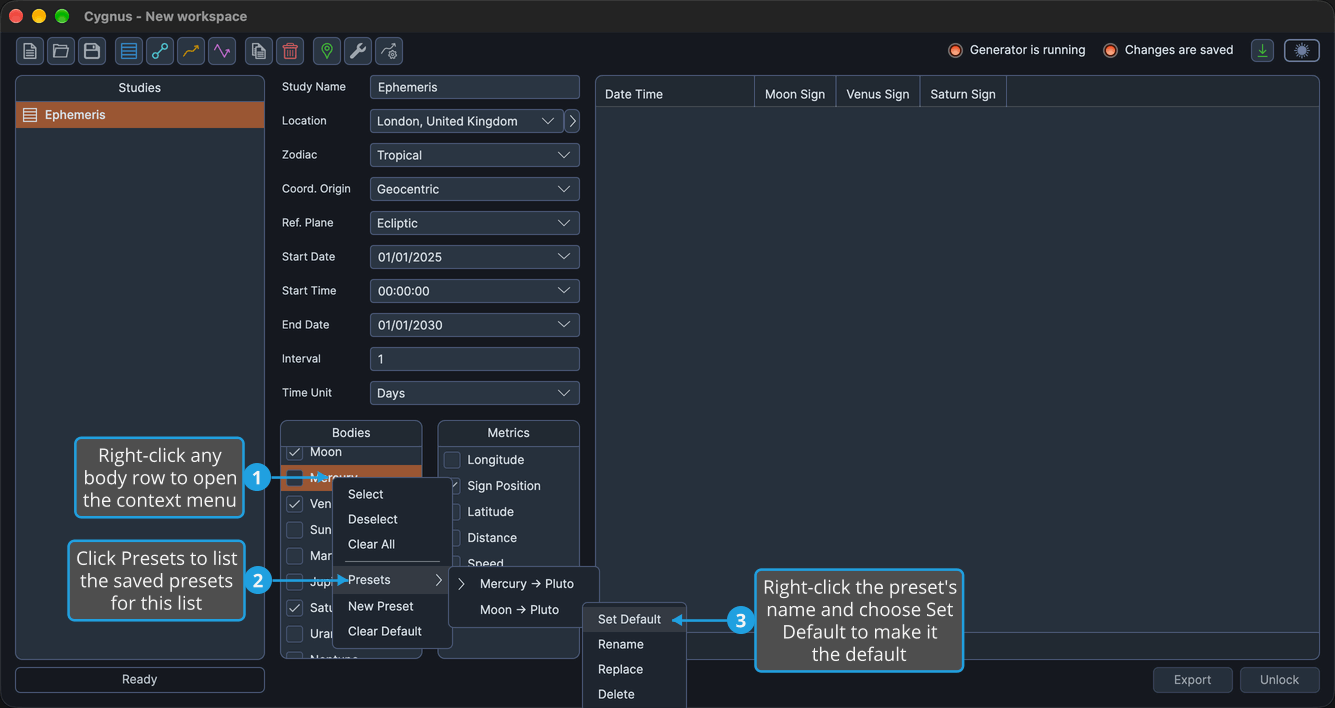
The preset is marked with a chevron in the Presets submenu, and it is applied to the list of the same kind in every new study.
Clear the Default Preset
Stop applying a default preset to this kind of list in new studies.
- Right-click any body row in the list.
- Click Clear Default in the context menu.
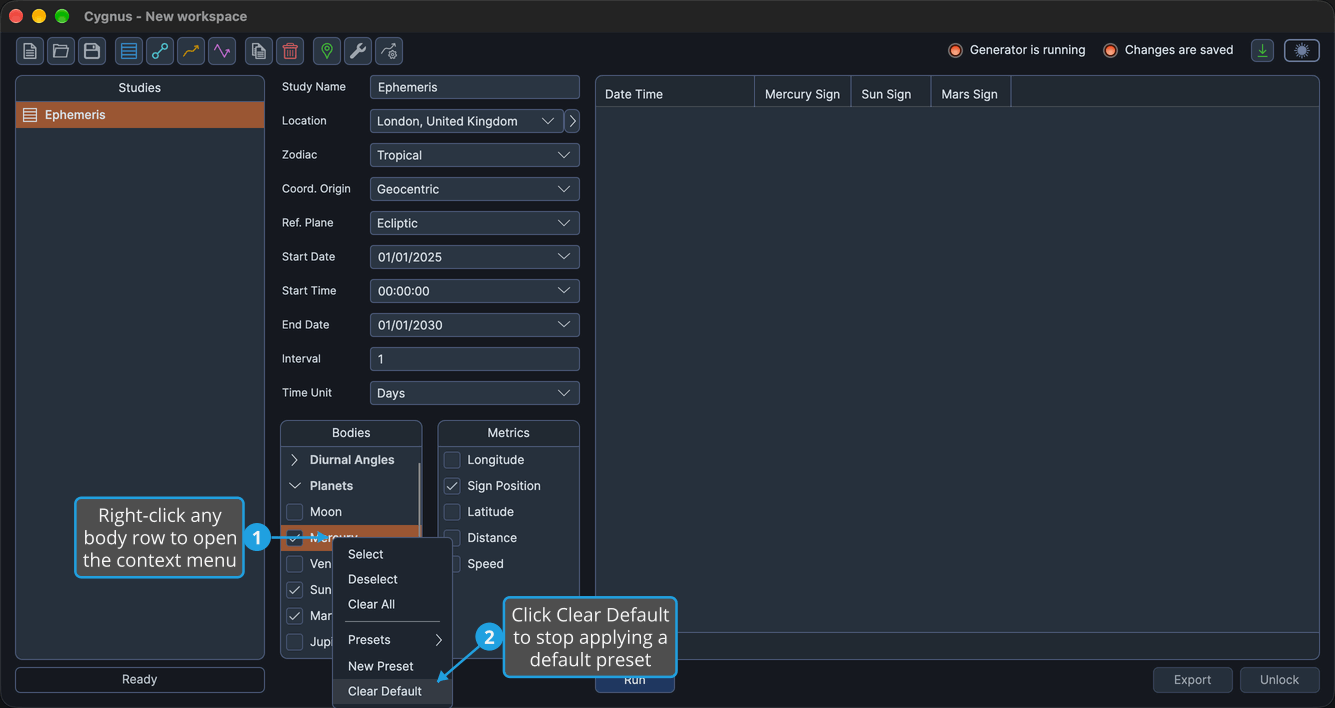
No preset of this kind carries the default chevron, and new studies no longer start this kind of list from a preset. Clear Default sits in the context menu itself, below the Presets submenu, and clears only the default of the list's own kind.
Rename a Preset
Give a saved preset a new name.
- Right-click any body row in the list.
- Click Presets in the context menu.
- Right-click the preset's name and choose Rename.
- Replace the current name in the name box of the Enter Name dialog with the new name.
- Click Save.
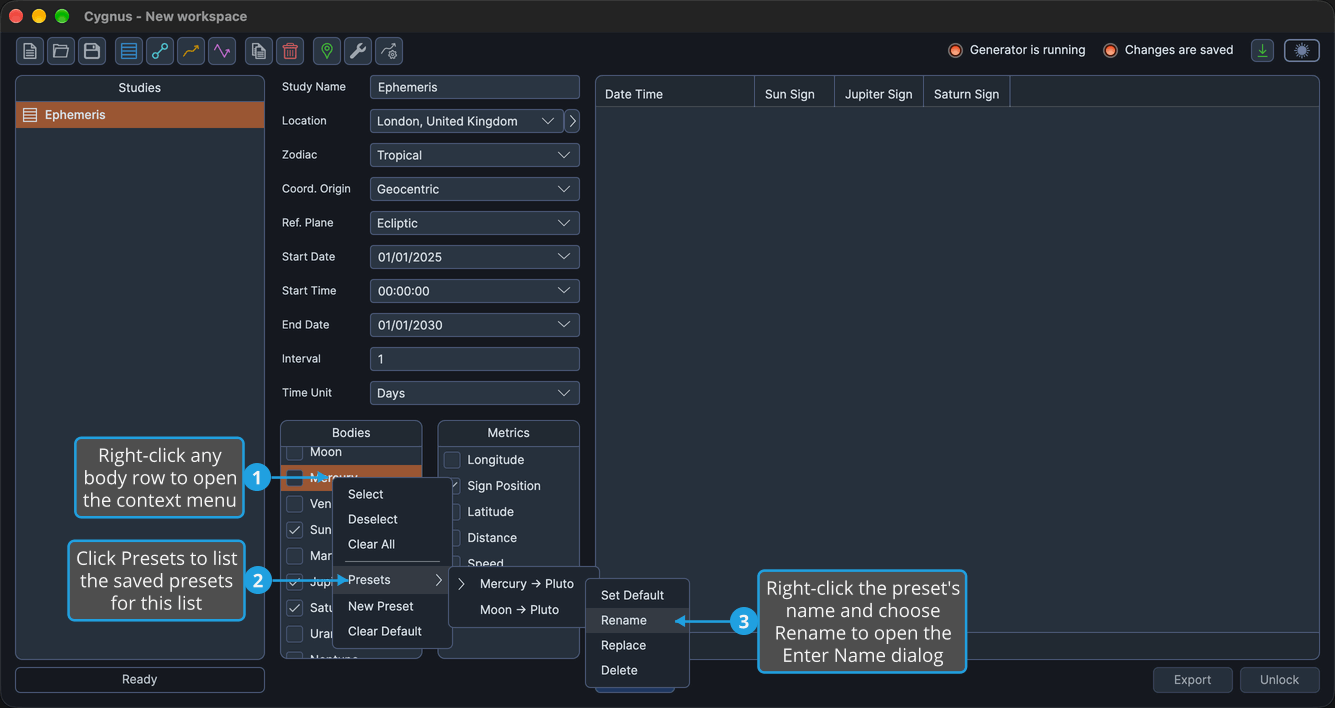

The preset is listed under its new name in the Presets submenu of every list of the same kind.
Replace a Preset
Overwrite a saved preset with the list's current body selection.
Cygnus replaces the preset without asking for confirmation.
- Right-click any body row in the list.
- Click Presets in the context menu.
- Right-click the preset's name and choose Replace.
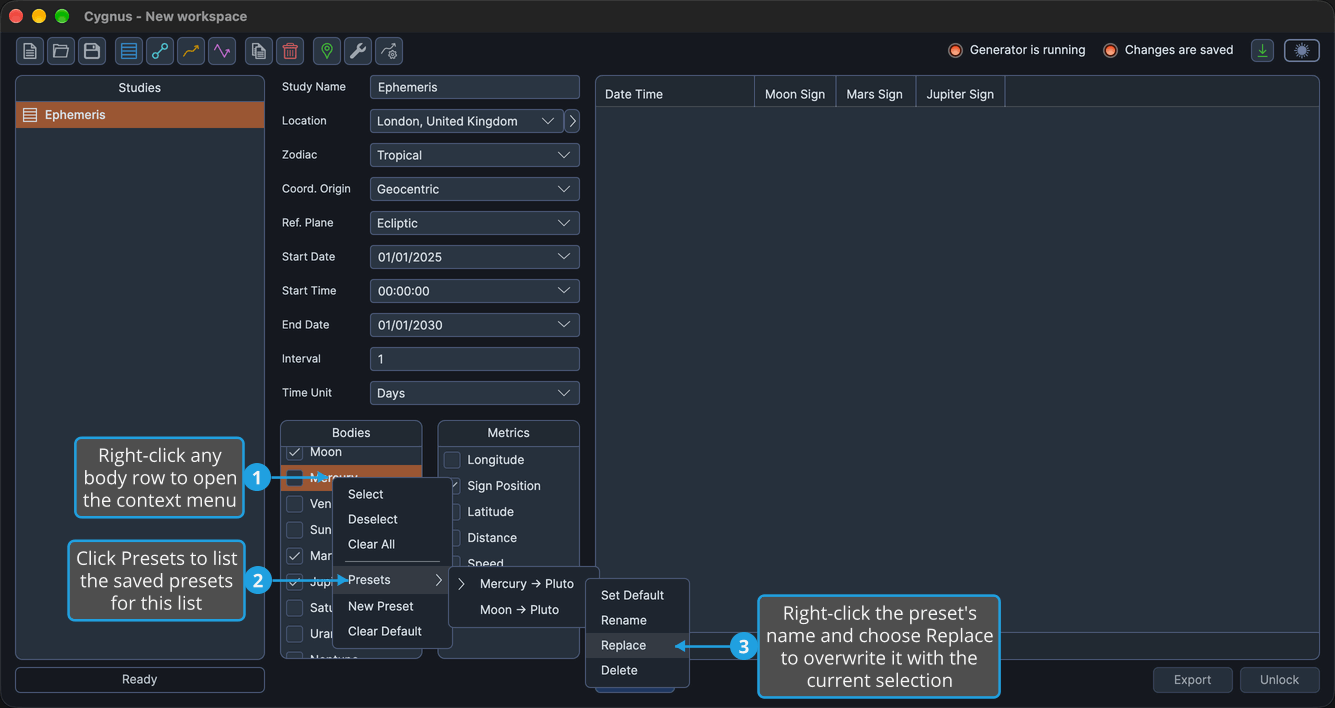
The preset keeps its name and its default mark, and now holds the list's current selection.
Delete a Preset
Remove a saved preset.
Cygnus deletes the preset without asking for confirmation.
- Right-click any body row in the list.
- Click Presets in the context menu.
- Right-click the preset's name and choose Delete.
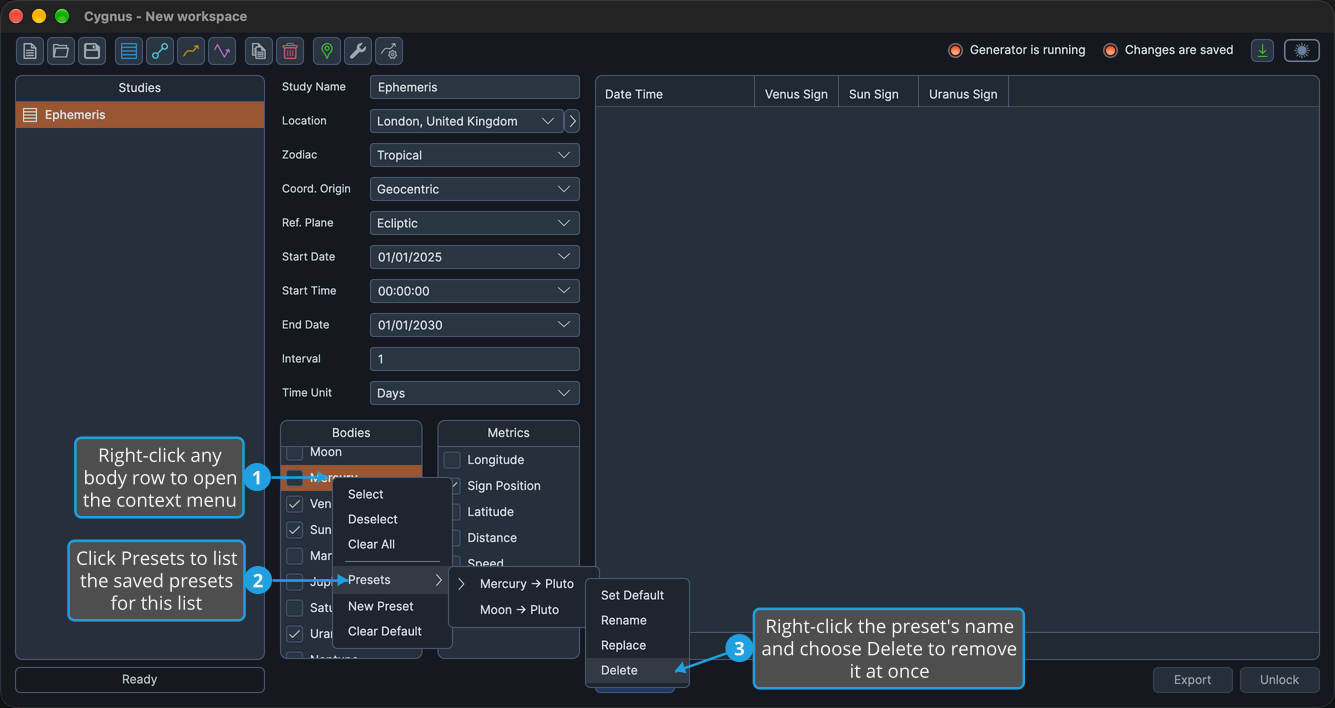
The preset disappears from the Presets submenu of every list of the same kind.
Presets Submenu
The Presets submenu lists the saved presets of the list's own kind, alphabetically by name: a Bodies list shows the presets saved from Bodies lists, an Inner Bodies list those saved from Inner Bodies lists, and an Outer Bodies list those saved from Outer Bodies lists. The default preset shows a chevron. Click a preset to apply its selection to the list, or right-click it to open the preset context menu. You add presets with New Preset from the body row menu.
Preset Context Menu
Right-clicking a preset in the Presets submenu opens a menu whose items act on that preset, with no separator:
| Item | Description |
|---|---|
| Set Default | Marks the preset as the default applied to this kind of list in new studies |
| Rename | Opens the Enter Name dialog to give the preset a new name |
| Replace | Overwrites the preset with the list's current selection |
| Delete | Removes the preset |