Aspects Table
Researchers work with their own set of angles: the classical majors, a harmonic series, or something unconventional. The Aspects table is where a study is told which angles to search for, and it searches for exactly those.
The table holds a list of cycle angles in degrees. When the cycle angle between two of the study's selected bodies matches one of them, the study generates an event.
There is no orb column and no orb setting on this table. The match is exact: an event is generated when the cycle angle between two selected bodies exactly matches an aspect in the list. The tolerance settings that some studies carry, such as the Transit Orb, govern something else. See Orb Settings.
Where the Table Appears
Ten studies carry the table. Four of them give it a tab of its own named Aspects; the rest put it on a combined tab such as Aspects & Natal Bodies, Aspects & Hotspots or Transiting Bodies & Aspects, which is clicked in exactly the same way. The column header over the single column of values names what the study is matching.
| Study | Column Header |
|---|---|
| Mundane Aspects Study | Aspects |
| Aspect Hotspots Study | Aspects |
| Primary Directions Study | Aspects |
| Solar Arc Directions Study | Aspects |
| Secondary Progressions Study | Aspects |
| Transiting Aspects Study | Transiting Aspects |
| Aspect Activations Study | Transiting Aspects |
| Conjunction Activations Study | Transiting Aspects |
| Solar Eclipse Activations Study | Transiting Aspects |
| Lunar Eclipse Activations Study | Transiting Aspects |
Each row holds one decimal degree value between 0 and 360.
Add a Cycle Angle
To put an angle into the list the study searches for:
- Click the Aspects tab.
- Type an angle in degrees into the entry box below the Aspects table.
- Press Enter to add the angle.
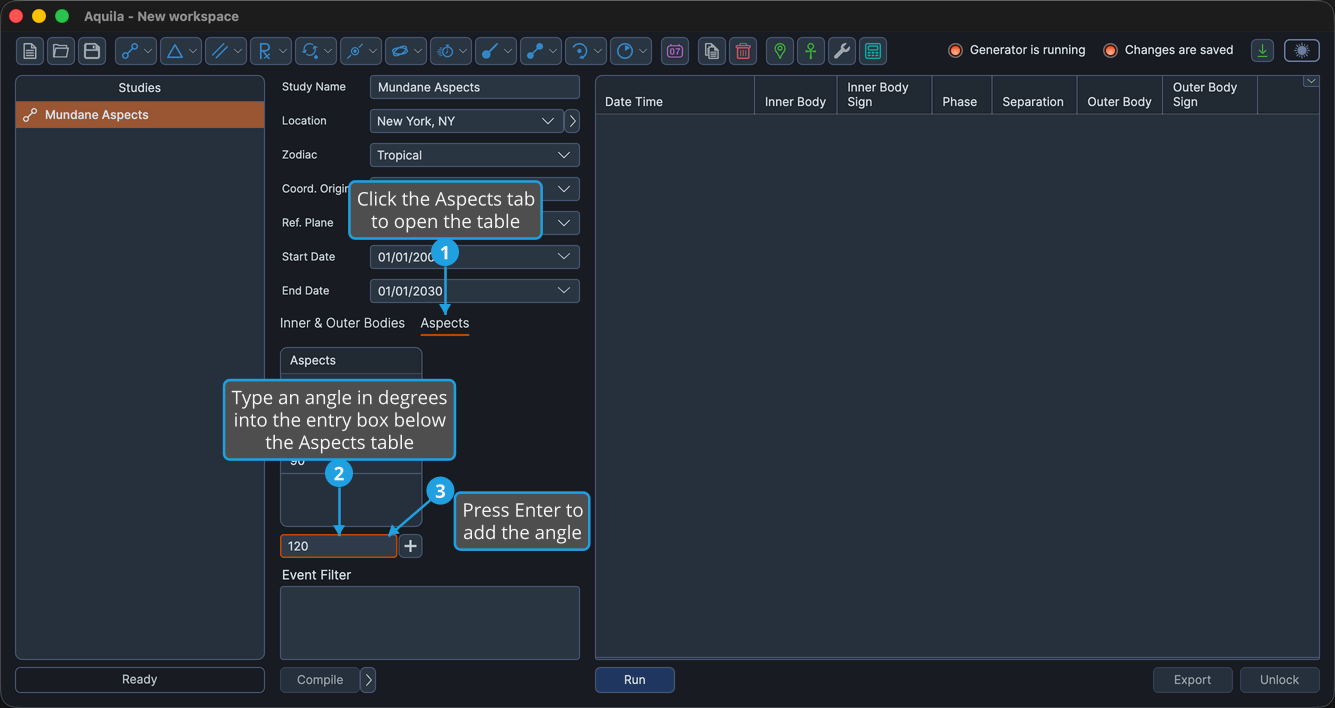
The angle appears as a new row and the entry box empties. The Add button to the right of the entry box does the same thing as pressing Enter; it is enabled only while the entry box holds a value and the study is unlocked. Text that does not parse as a number is rejected, and the entry box keeps its content.
Edit a Cycle Angle
To change an angle already in the table without removing it and adding a replacement:
- Click the Aspects tab.
- Click the row holding the angle to select it.
- Click the value cell in the selected row to open the editor.
- Type the new angle in degrees and press Tab or Enter to commit the edit.
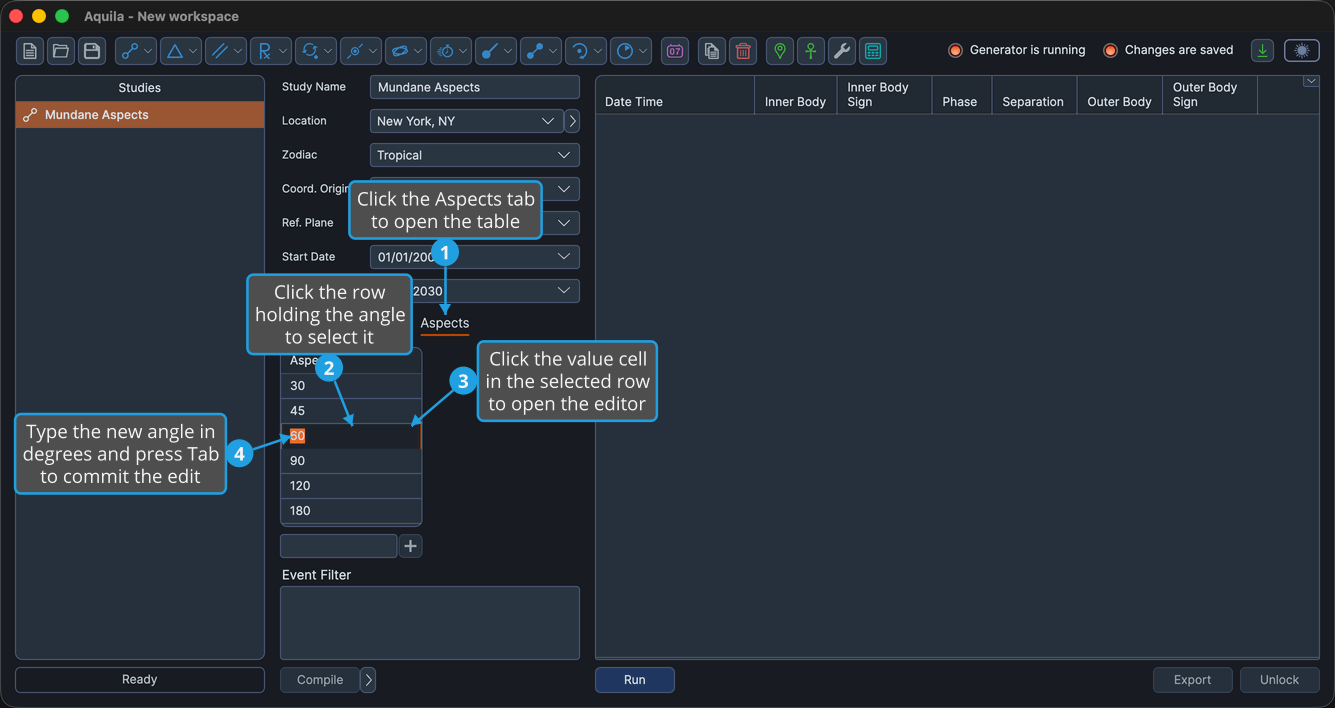
The row shows the new angle, and the study searches for it in place of the old one. The editing gesture is shared with the other numeric tables and is documented in full at Edit a Value in a Numeric Table below.
Edit a Value in a Numeric Table
The Aspects, Hotspot Degrees and Arcs tables share one editing gesture, described here once.
To change a value in place:
- Click the row holding the value to select it.
- Click the value cell in the selected row to open the editor.
- Type the new value.
- Press Tab or Enter to commit the edit.
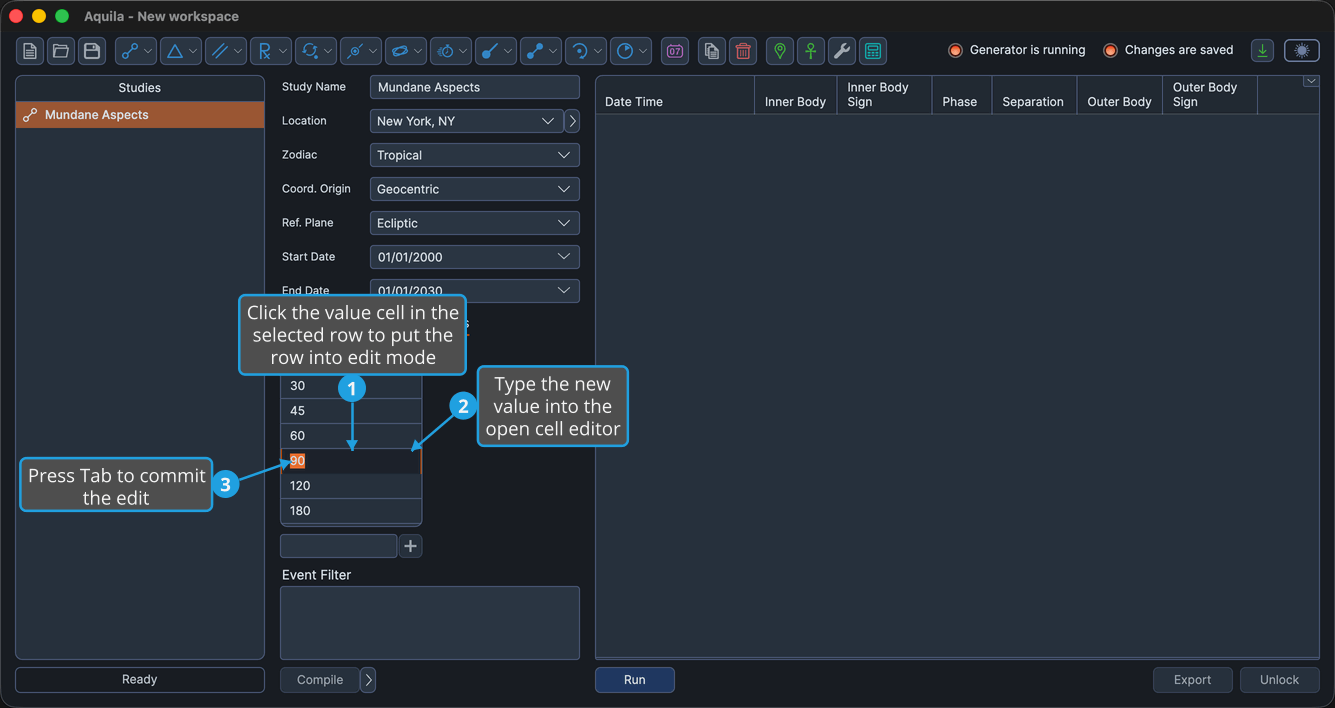
The gesture is two separate single clicks, never a double-click. The first click selects the row; the second, on a cell of the selected row, opens the editor. Tab and Enter both commit the value: Tab additionally carries focus on to the next cell in the same row, while Enter commits it in place. The row stays in edit mode until focus leaves it, so further cells in the same row are reached by tabbing to them or clicking them in turn.
Only digits and a decimal point are accepted while a cell is in edit mode. Every other character is ignored.
The table is disabled while the study is locked, so the row to be changed must be in an unlocked study.
Delete Selected Cycle Angles
To remove one or more angles the study should no longer search for:
- Click the Aspects tab.
- Select the rows to remove in the Aspects table.
- Open the Numeric Table Context Menu and click Delete Selected.
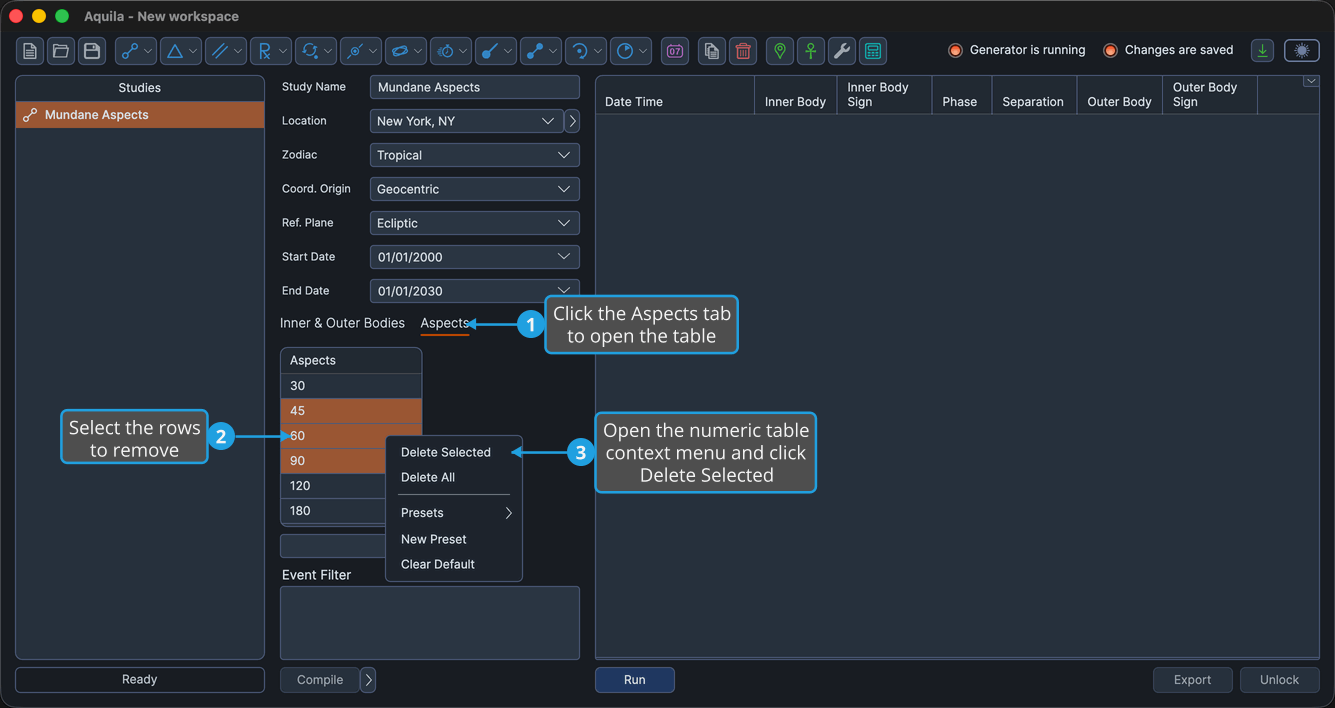
The selected rows disappear and the study stops searching for those angles.
Pressing the Delete key with rows selected removes them without opening the menu. Extend the selection with Shift-click or Cmd-click to remove several rows at once. On Windows use Ctrl-click in place of Cmd-click.
Delete All Cycle Angles
To empty the table so a fresh set of angles can be entered:
- Click the Aspects tab.
- Open the Numeric Table Context Menu.
- Click Delete All in the context menu.
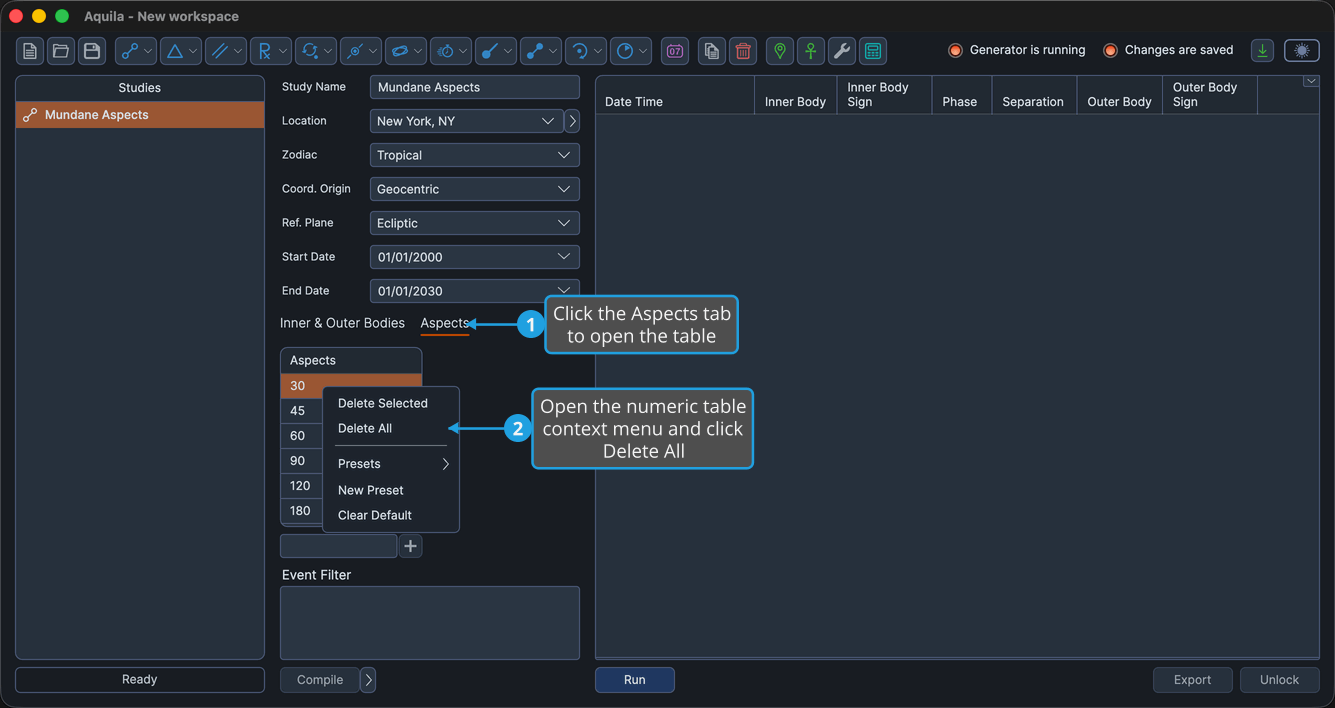
Aquila removes every row, whatever was selected, and the study has no angles left to search for.
Sort the Aspects Table
Angles are appended in the order they are typed, which makes a long list awkward to check. To put them in ascending numeric order:
- Click the Aspects tab.
- Click the Aspects column header.
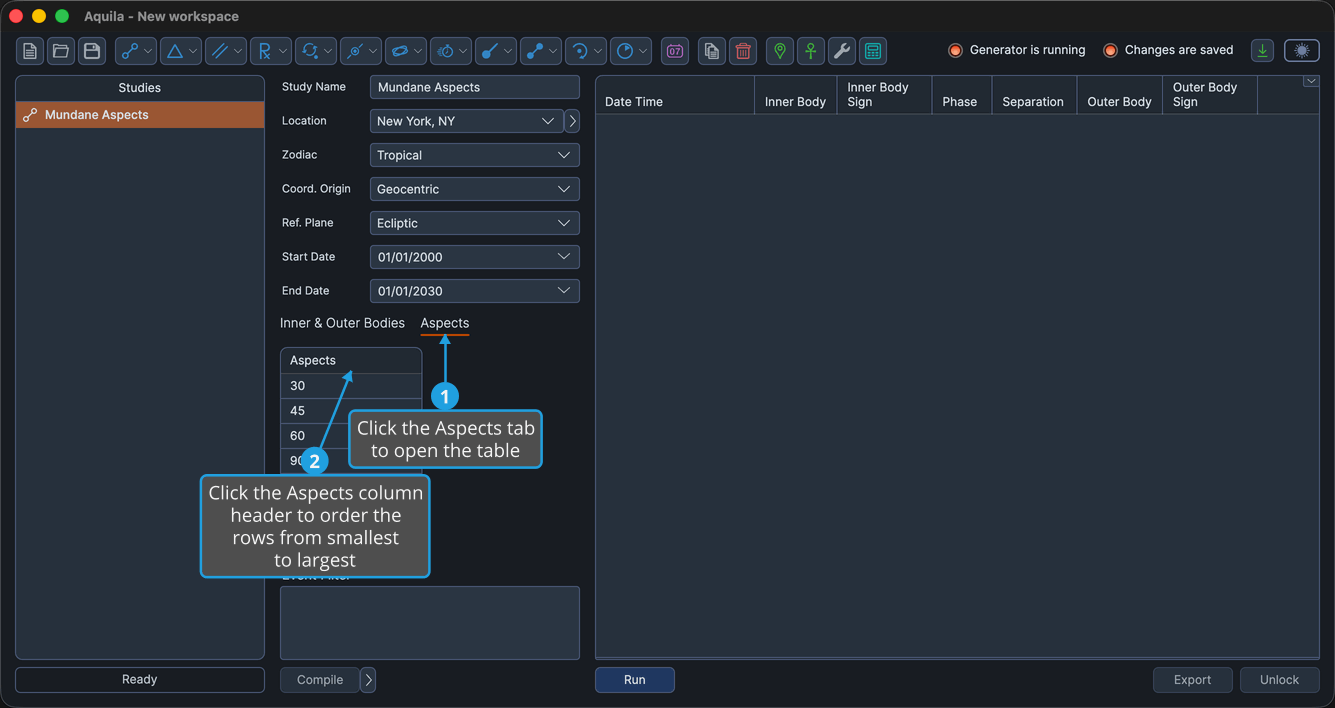
Aquila reorders the rows from the smallest angle to the largest. Nothing happens while the study is locked, or while the table holds one row or fewer.