Ephemeris Parameters
The Ephemeris Parameters appear at the top of every event-generator study and define the astronomical context for the calculations: the location, the Reference System (Zodiac, Coordinate Origin, and Reference Plane), and the date range. Together with the body selections, these parameters fully determine which events the study will produce.
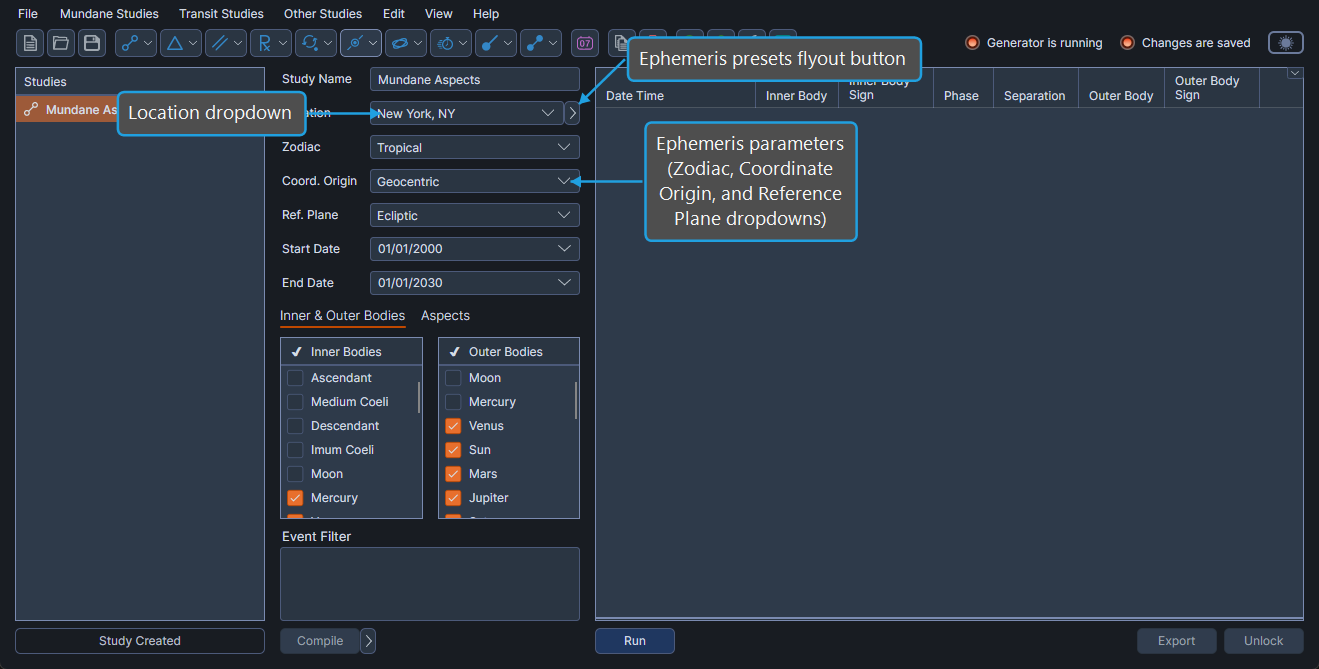
A location is required for every study, even when calculations are geocentric or heliocentric, because Aquila uses the location's time zone to express event date and time in local civil time.
Configure Ephemeris Parameters
The four ephemeris parameter dropdowns set the geographic location and the Reference System used by the study.
To configure the ephemeris parameters:
- Set the Location, Zodiac, Coord. Origin, and Ref. Plane dropdowns to the desired values.
| Dropdown | Description |
|---|---|
| Location | The geographic location whose time zone is applied to event timestamps. Locations come from the Locations Editor. |
| Zodiac | The zodiac system used for sign-based calculations. |
| Coord. Origin | The origin of coordinates: Geocentric, Heliocentric, or Topocentric. The choice affects which bodies are available in the Selectable Bodies List. |
| Ref. Plane | The reference plane (for example Ecliptic or Equatorial). Determines whether longitude/latitude or right ascension/declination are reported. |
The same setting is labelled Zodiac on the study's Ephemeris Parameters and Zodiac System in the Default Settings Editor. Both labels refer to the same zodiac-system selector.
Configure the Ephemeris Tab
Studies that present an Ephemeris tab combine the ephemeris parameters and the date range on a single tab.
To configure every parameter on the Ephemeris tab:
- Click the Ephemeris tab.
- Set the Location, Zodiac, Coord. Origin, and Ref. Plane dropdowns to the desired values.
- Set the Start Date and End Date pickers to bound the time window.
Configure Date Range
The Start Date and End Date pickers bound the time window over which the study searches for events.
To set the date range:
- Set the Start Date and End Date pickers to the desired dates.
The end date must be later than the start date. Aquila evaluates events at any moment within the inclusive range.
Ephemeris Presets
The presets flyout button beside the ephemeris parameters saves the entire ephemeris parameter set (Location, Zodiac, Coord. Origin, Ref. Plane, Start Date, End Date) as a named preset. Use presets to apply the same Reference System (or astronomical context) to several studies in one click.
Apply an Ephemeris Preset
To apply a saved Ephemeris preset:
- Click the Ephemeris presets flyout button.
- Click the Presets menu item to expand the saved presets list.
- Click the desired preset name to apply it.
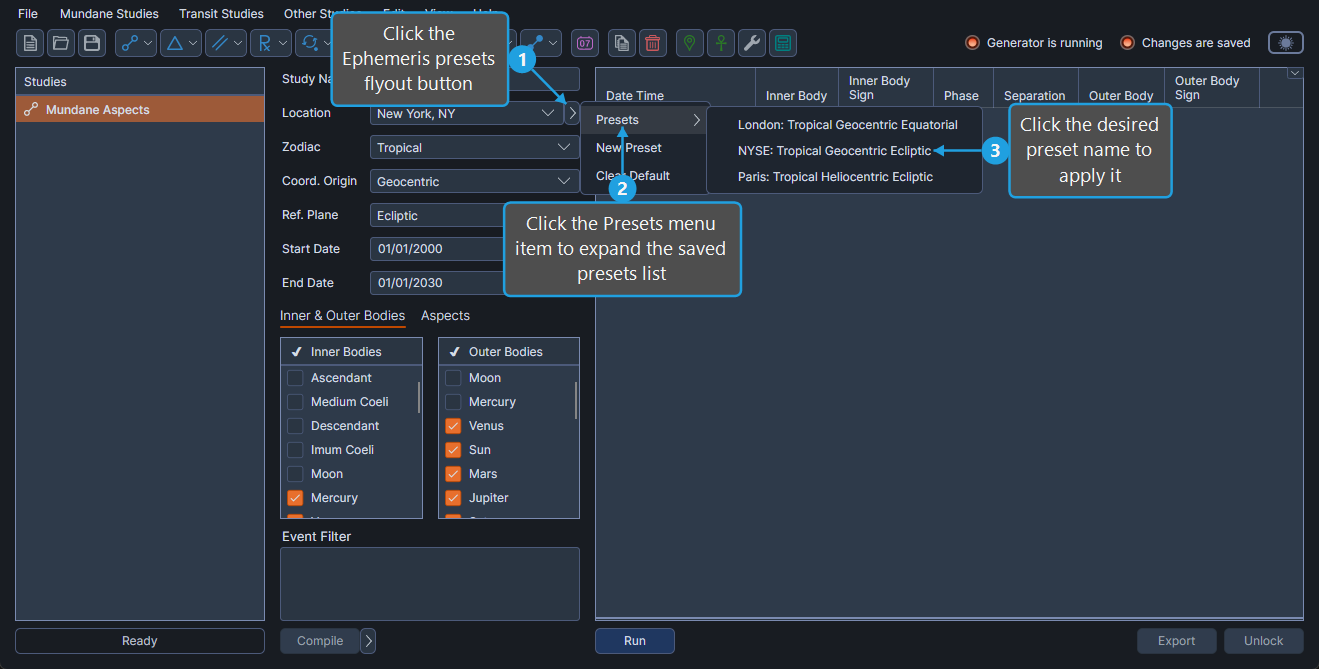
The Location, Zodiac, Coord. Origin, Ref. Plane, Start Date, and End Date controls update to the preset's stored values.
Save a New Ephemeris Preset
To save the current ephemeris parameters as a new preset:
- Click the Ephemeris presets flyout button.
- Click New Preset in the flyout menu.
- Type a name for the preset in the Name Entry dialog and click OK.
The new preset appears in the Presets submenu of the flyout.
Set the Default Ephemeris Preset
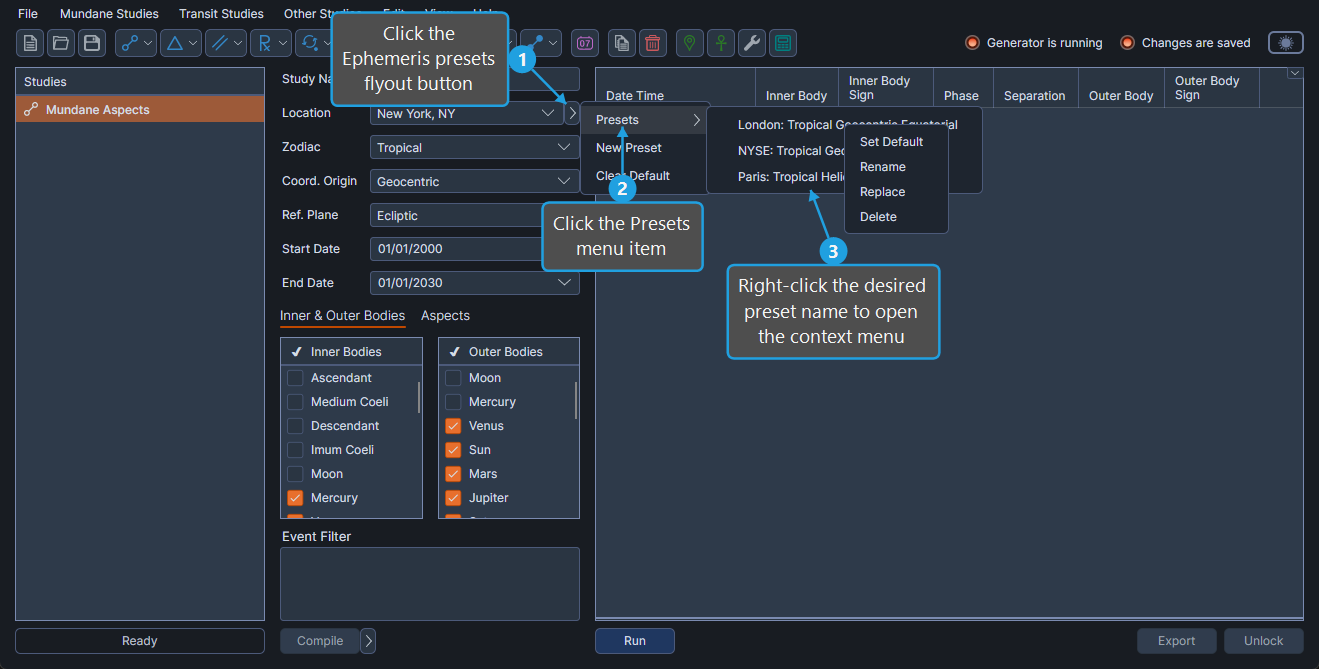
The default Ephemeris preset is auto-applied to newly created studies. To set a preset as the default:
- Click the Ephemeris presets flyout button.
- Click the Presets menu item.
- Right-click the desired preset name and click Set Default in the context menu.
Clear the Default Ephemeris Preset
To remove the default-preset designation:
- Click the Ephemeris presets flyout button.
- Click Clear Default in the flyout menu.
No preset is auto-applied to new studies until you set a new default.
Rename an Ephemeris Preset
To change the displayed name of a preset:
- Click the Ephemeris presets flyout button.
- Click the Presets menu item, then right-click the preset to rename and click Rename in the context menu.
- Type the new name in the Name Entry dialog and click OK.
Replace an Ephemeris Preset
Replacing a preset overwrites its stored values with the current ephemeris parameters.
To replace a preset:
- Click the Ephemeris presets flyout button.
- Click the Presets menu item, then right-click the preset to replace and click Replace in the context menu.
- Click Yes to confirm the replacement.
Delete an Ephemeris Preset
To remove a preset:
- Click the Ephemeris presets flyout button.
- Click the Presets menu item, then right-click the preset to delete and click Delete in the context menu.
- Click Yes to confirm the deletion.